My quilting friends and I did a Block of the Week in 2013. One of the October blocks was the Jack in the Pulpit block. Many of my friends were good and did it in October, some in December. I'm just getting to it now in January. The inspiration to try came from their struggles with the directions as written. On my first draft, I got something close to the end product, but had lots of trouble with sections not coming out the right size. So, I am writing out these experiences here that I've had this weekend so that others who are bringing up the rear with me can have a little more information with which to troubleshoot their own Jack in the Pulpit blocks.
Here is a picture of the first draft, finished. I didn't actually take pictures of this particular color scheme as I was going along because I didn't think I would have so much trouble. I went back and redid it using scraps from my scrap bag when I tried to figure out how I should have done it.
 | |
| Jack in the Pulpit in Blue |
To standardize, I am speaking of block # 1684 on page 126 of Maggie Malone's "5,500 Quilt Block Designs."
Before you begin, try some of these things that have tripped me up in the past:
1. Do you need to make your seam scant-er? Sometimes I get distracted and my scant seams slip past the edge of my seam guide.
2. Are you using a wacky thread size, not your usual thickness? I've noticed that the thickness of thread can throw off how scant you need to make your seam. I won some Aurifill thread as a door prize a while back, and noticed that it lays much thinner than my usual Mettler or Gütermann thread. When I was working on the Christmas pageant costumes I used spools of very old thread that I inherited from my grandmother, because I wanted to use it up. (Don't worry- it wasn't vintage thread on the nice wooden spools, this is polyester 1980s stuff.) This thread lay much thicker than usual.
3. Check your needle position. (Corollary to #1) By any chance, have you bumped the stitch position knob with your elbow, or has your 5-year old moved it while attempting to sit on top of the sewing machine? (These are purely hypothetical situations, of course, and in no way happened in the last 48 hours, ha ha ha.)
Now that you've squared this away, here are the cutting directions that I found work best for one 6" finished size block.You will need scraps of a dark, medium, and light fabric. I found it also helpful to write the names of each triangle on a piece of paper and pin it to the stack.
Light fabric:
2 squares at 2 1/2", cut diagonally in half once. Label these "A" triangles.
2 squares at 2 1/2", left plain
4 squares at 2 3/8", cut once diagonally. Label these your "B" triangles.
Medium fabric:
3 squares at 2 1/2"
Dark fabric:
Okay, here's where things get wacky. You have two options:
Option 1:
2 rectangles at 1 1/4" x 3 3/8"
2 rectangles at 1 1/4" x 4 3/4"
Option 2:
2 rectangles at 1 3/16" x 3 3/8"
2 rectangles at 1 3/16" x 4 3/4"
Step 1:
Start by sewing two Light A triangles to opposite sides of one of the Medium squares. Make sure you match up the centers of the triangles with the center of the square. Press to the outside. Then add the other two Light A triangles. Press to the outside again.
 |
| Step 1, not squared yet. |
Step 2:
As I hinted at the beginning, the Dark rectangles are where the block math gets wacky. If you use the Option 1 rectangles, your next square will be ever so slightly too large and the rectangle ends won't be flush with each other. If you use Option 2, you need a ruler that goes to 1/16th of an inch. I have heard such things exist, but do not own one. While trying to reverse-engineer the block math, I tried using rectangles that were 1 1/8" wide, but they were too narrow. I got it to ease somewhat through careful pinning and putting the side with too much underneath next to the feed dogs, but it ended up puckery.
 | |
| Puckery edges, notice also not square, not 4 3/4" |
If you are lucky enough to have a ruler that goes to 1/16", then you can sew the sides on with no trouble.
Step 2, Option 1:
If you do not have a ruler that goes to 1/16", make the blocks the slightly bigger size. Sew the first two Dark rectangles on the sides. Press to the outside. It will hopefully look like this:
 |
| Shorter rectangles added |
It quite possibly will be ever so slightly too wide, 4 7/8" instead of 4 3/4". Shave tiny amounts off the edges until it is the right width. Then sew on the longer rectangles. Shave again as needed, until the block is squared up at 4 3/4" square. Your points will probably not touch the border. (I decided that was less important than having a block that squared up to the right dimensions.)
Step 3:
Make half-square triangles out of the remaining two Medium squares and the remaining two Light squares. Press toward the Medium fabric.
 |
| Half-square triangles |
Step 4:
Sew the Light B triangles to the sides of the half-square triangles. Start by arranging the pieces so the Medium triangle is on the bottom facing you. Flip the Light B triangle so that the right-angle corner is in the top right corner.
 |
| Beginning the side triangles |
Stitch along the right-hand edge. Press to the Light triangles.
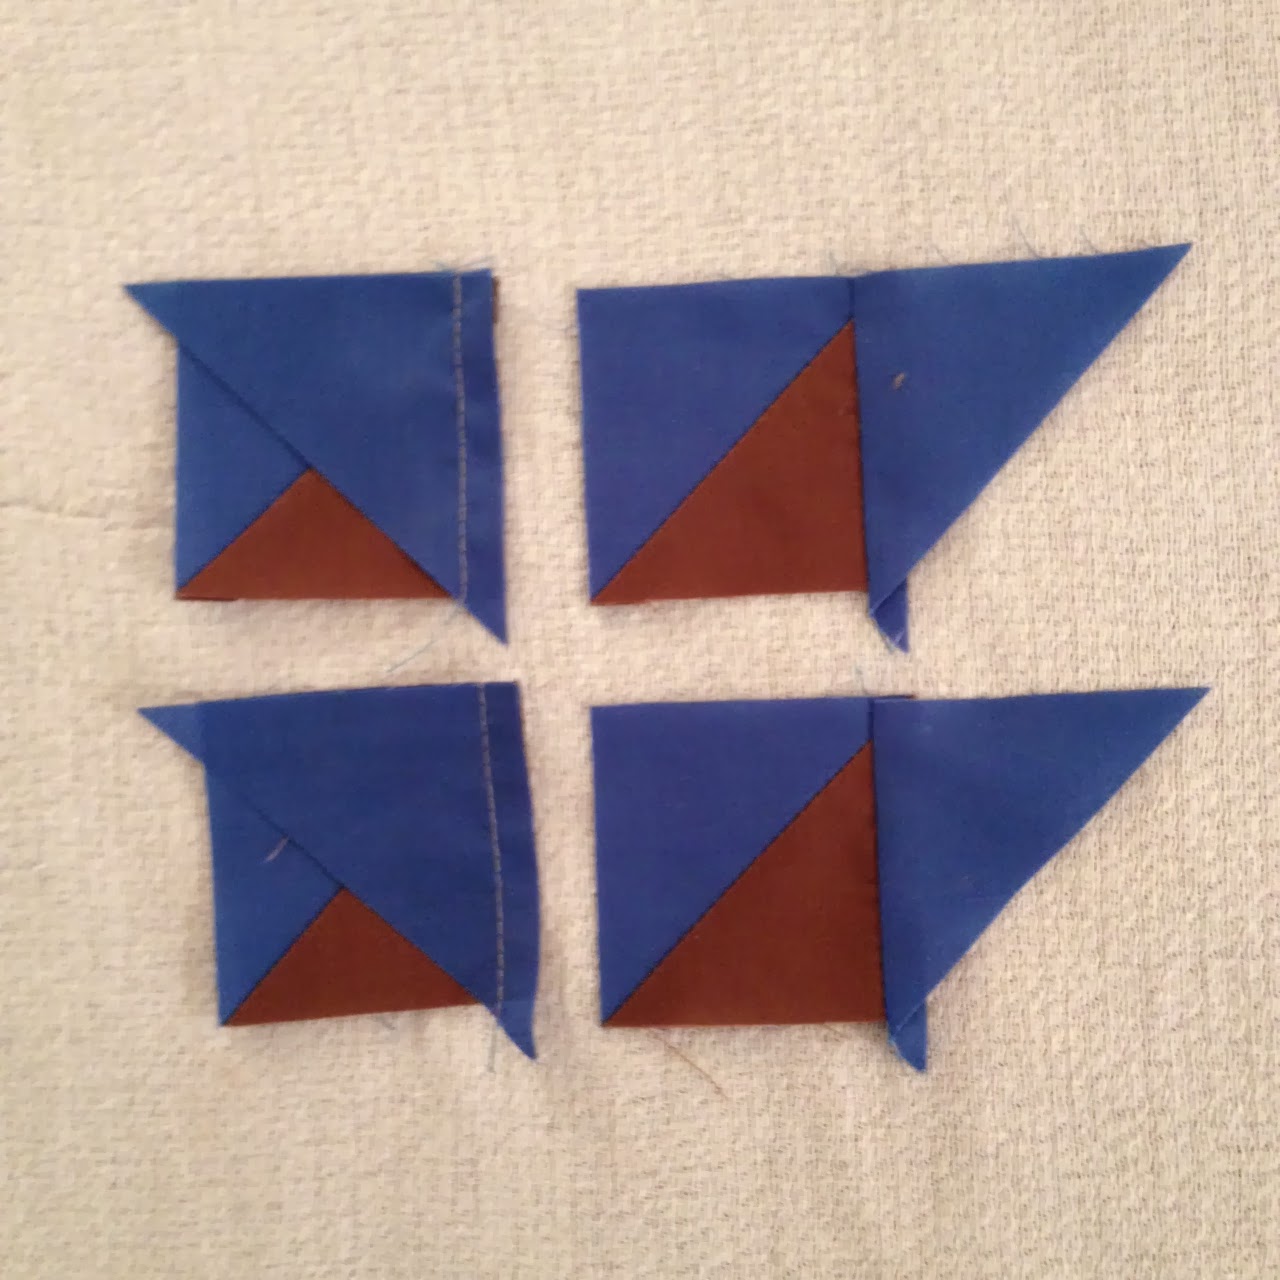 |
| First side triangles added |
Turn the pieces so that the sloped side points to the left. Add the remaining Light B triangles to the new top right corner.
 |
| Ready to add remaining side triangles |
 |
| Sew along right hand edge. If your seam line goes through the notch, you got it right. |
Press the seam to the Light B triangle. Slice off the tails with your rotary cutter, but be sure to keep your fingers out of the way! (I sliced my finger ever so slightly yesterday on my first draft of the block.)
 |
| Side triangles ready to go |
Step 5:
Crease the square to find the center of the framing Dark rectangles and match the center of the side triangles. Pin in place. Sew two triangles on opposite sides of the square. Press to the inside.
Crease the square to find the center of the framing Dark rectangles and match the center of the side triangles. Pin in place. Sew two triangles on opposite sides of the square. Press to the inside.
 |
| Pinned to outer square |
In the same way, pin two triangles on the remaining opposite sides and stitch in place. Press to the inside. Square up to 6 1/2" inches unfinished.
 |
| Finished block |
I used Mettler thread on a Pfaff machine with quilting presser foot with walking foot. I used scant 1/4" seams. The original fabric were quilting cottons plus a heavier woven plaid. The fabric used in the demo is a polyester fabric left over from the Christmas pageant costumes. I used starch on the original fabric but not on the demo.
No comments:
Post a Comment